How to Install a Hockey Skate Blade
(Step-by-Step Guide for Quick-Release Holders)

Whether you're replacing worn-down steel, swapping blade profiles, or installing a fresh set of blades for the first time, knowing how to install a hockey skate blade properly is an essential skill for today's players and parents. With quick-release skate holders now on almost every skate, changing steel is faster and easier than ever, but only when it's done correctly. This step-by-step guide walks you through how to safely and securely install hockey blades in CCM, True, Daoust, and Bauer quick-release holders, as well as non-quick-release Bauer LS2 and Graf Cobra holders, helping you avoid common mistakes and ensure your skates are game-ready before you hit the ice.

CCM Hockey Skates
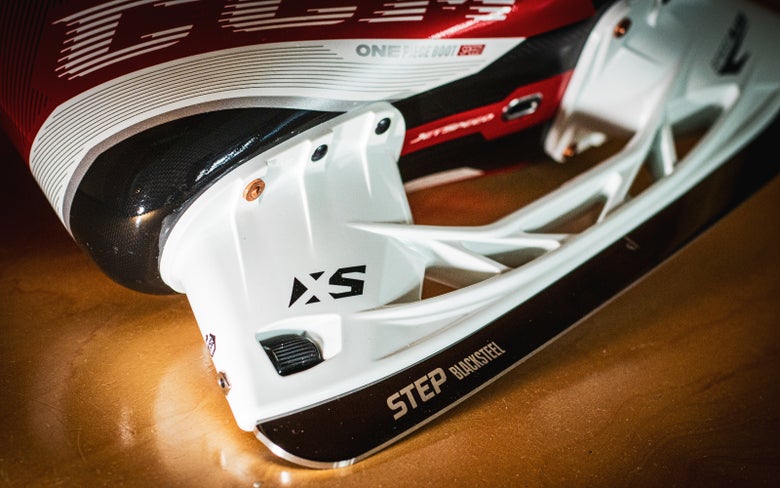
CCM SpeedBlade XS Holder: Blade Installation Steps
- Preparation: Grab a towel or glove for better grip and cut protection.
- Remove the Blade: Rotate the dial counterclockwise to the release position until it disengages. Remove the blade at the heel first, then pull it straight out.
- Install the Blade: Slide the new blade in toe first, then seat the heel into place. Rotate the dial clockwise back to the locked position until it's firmly secured.
- Safety Check: Wiggle the blade side to side and pull outward on the blade; there should be no movement. Visually confirm the dial is fully back in the locked position.
Tips:
- If the blade feels stuck when trying to remove, double-check that the dial is fully disengaged.
- Make sure the blade is fully seated in the channel before locking.
True Hockey Skates
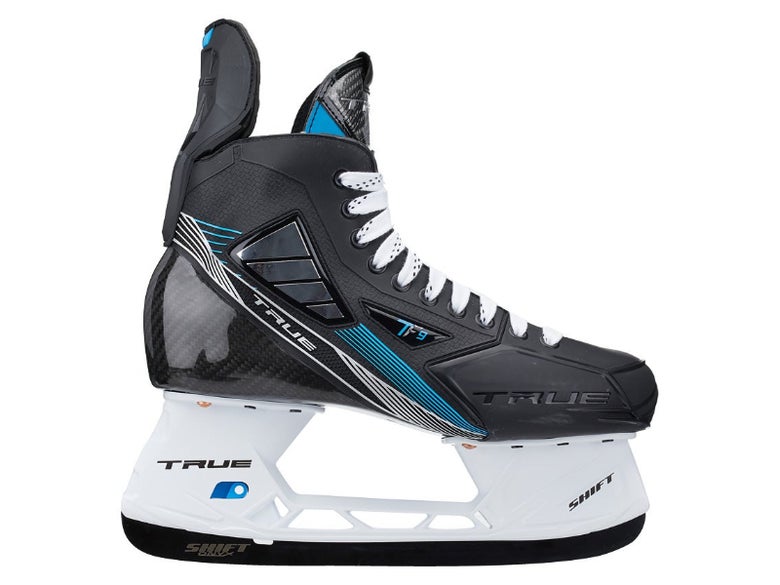
True SpeedShift, Shift Max, and Shift Holder: Blade Installation Steps
- Preparation: Grab a towel or glove for added grip and cut protection. Use True's blade-change tool or a similar small screwdriver for the holder mechanism.
- Remove the Blade: Locate the small hole on the holder's release mechanism. Squeeze the trigger system by using the small hole and True's blade-change tool or a compatible small tool, disengaging the lock. Remove the blade by the heel first, then pull it straight out.
- Install the Blade: While still squeezing the trigger and keeping the lock disengaged, slide the new blade in toe first, then seat the heel into place. Let the mechanism return to the locked position.
- Safety Check: Wiggle the blade side to side and pull outward on the blade; there should be no movement. Visually confirm the mechanism is fully back in the locked position.
Tips:
- If the blade won't release, make sure you squeeze the mechanism all the way.
- You can use your hockey skate lace to disengage the mechanism if you don't have a tool.
- Make sure the blade is fully seated in the channel before locking.
- When installing, do not slam the blade into the holder when the mechanism is in the locked position.
Daoust Hockey Skates

Daoust Perfecta Kwik-1 Holder: Blade Installation Steps
- Preparation: Grab a towel or glove for added grip and cut protection.
- Remove the Blade: Locate the release mechanism and squeeze to disengage the locking mechanism. Remove the blade by the heel first, then pull it straight out.
- Install the Blade: While still squeezing the trigger and keeping the lock disengaged, slide the new blade in toe first, then seat the heel into place. Let the mechanism return to the locked position.
- Safety Check: Wiggle the blade side to side and pull outward on the blade; there should be no movement. Visually confirm the mechanism is fully back in the locked position.
Tips:
- If the blade won't release, make sure you squeeze the mechanism all the way.
- Make sure the blade is fully seated in the channel before locking.
- When installing, do not slam the blade into the holder when the mechanism is in the locked position.
Bauer Hockey Skates

Bauer PowerFly and Tuuk LightSpeed Edge Holders: Blade Installation Steps
- Preparation: Grab a towel or glove for added grip and cut protection.
- Remove the Blade: Locate the release mechanism and squeeze to disengage the locking mechanism. Remove the blade by the heel first, then pull it straight out.
- Install the Blade: While still squeezing the trigger and keeping the lock disengaged, slide the new blade in toe first, then seat the heel into place. Let the mechanism return to the locked position.
- Safety Check: Wiggle the blade side to side and pull outward on the blade; there should be no movement. Visually confirm the mechanism is fully back in the locked position.
Tips:
- If the blade won't release, make sure you squeeze the mechanism all the way.
- Make sure the blade is fully seated in the channel before locking.
- When installing, do not slam the blade into the holder when the mechanism is in the locked position.
Step-by-Step Guide for Non-Quick Release Holders

Bauer Tuuk LS2 Holder: Blade Installation Steps
- Preparation: You'll need an 8mm socket, as a heel nut inside the boot and a bolt inside the holder secures the blade. Grab a towel or glove for added grip and cut protection.
- Remove the Blade: Pull out the skate's insole/footbed to access the heel nut. Using an 8mm socket, remove the heel nut that holds the runner in place. Now you can remove the blade by the heel first, then pull straight out.
- Install the Blade: Slide the new blade's toe into the front of the holder first. Attach the bolt to the heel of the blade and feed it into the holder through the mounting hole. Using the 8mm socket, secure the nut to the bolt inside the boot.
- Safety Check: Wiggle the blade side to side and pull outward on the blade; there should be no movement. Visually confirm the nut is firmly secured to the bolt.
Tips:
- Make sure the runner is fully seated in the channel before locking.
- A socket screwdriver is recommended for using the 8mm socket inside the hockey skate.
- When removing the old blade, take note of how the bolt is attached to the heel of the blade.

Graf Cobra 5500 Holder: Blade Installation Steps:
- Preparation: You'll need a Flathead screwdriver (some newer models may require a 4mm hex bit), as the blade is held inside the holder by a screw and bolt. Grab a towel or glove for added grip and cut protection.
- Remove the Blade: Unscrew the brass T-nut at the back of the holder. Slide the entire blade toward the toe first, then pull straight out.
- Install the Blade: Attach the blade bolt to the new blade and feed the threaded portion up through the bottom of the holder. Seat the entire blade down into the holder channel and slide back toward the heel. Insert the brass T-nut through the back of the holder and secure it to the blade bolt.
- Safety Check: Wiggle the blade side to side and pull outward on the blade; there should be no movement. Visually confirm the nut is firmly secured to the bolt.
Tips:
- Make sure the runner is fully seated in the channel before locking.
- When removing the old blade, take note of how the blade bolt was attached to the heel of the blade.
What to Know Before Installing New Blades
Swapping skate blades is quick and easy once you've done it once, but it's important that you start off with the right runner. Make sure your replacement blade is compatible with your holder model and is the correct size for your skates. Quick-release runners aren't universal, even within the same brand. If the blade does not hook into the toe and heel of the holder, don't force it. First, check to see if the blade is the correct model and size for your skate's holder. For more information on how to size a hockey skate blade and holder, along with blade and holder compatibility, use our dedicated learning center using the button below.
Installing a Hockey Skate Blade FAQs
How do I remove a hockey skate blade from a quick-release holder?
Unlock the holder's release mechanism (dial/trigger) and then slide the blade out heel first, followed by the toe. Even unsharpened steel can still cut, so use a towel or glove for better grip and hand protection.
Which direction does the runner go (how do I tell the toe from the heel)?
Most runners have a brand logo etched into the blade. This logo is usually on the heel of the blade. While blades can be worn on either skate, generally the logo faces out when skating. If you're unsure, compare the blade to the one you removed and match the orientation.
Do I insert the blade toe-first or heel-first?
Quick-release holders install toe-first and finish at the heel so the locking mechanism can engage at the back. Follow your holder's specific steps and don't force it if it doesn't install smoothly.
What should I do if the new blade won't slide into the holder channel?
First, confirm you have the correct compatibility by checking your blade model and size for your holder, which is usually the most common issue. Clean any debris or ice that can block the installation. Re-check that you're inserting it in the correct direction (toe to heel).
What should I do if the blade feels stuck and won't come out?
Make sure the release mechanism is fully disengaged, then keep steady pressure on it while you pull the blade out heel first. If it's stubborn, have someone hold the trigger and skate in the release position as you slide the blade out, and use a towel or glove for cut protection.
What causes my hockey blades to make clicking noises?
Clicking usually happens when there's a small gap between the blade and the holder, which is often harmless and only heard when walking to and from the locker room. Still, you should inspect the holder and steel for loose hardware, cracks, or damage. Remove the runner, clean the holder channel, and reinstall it to ensure it's fully seated. If the blade locks in firmly with no play, your skating performance shouldn't be affected.
Can I replace just one blade, or should I replace both at the same time?
You can replace one, but it's highly recommended to replace both so they match in blade height, profile, and performance. Mixing old and new steel can feel uneven and badly affect balance, performance, and stopping.
Will swapping to new steel change how my skates feel on the ice?
Yes, new steel has more height and will feel more responsive on edges, turns, and stops. Some brands pre-profile their blades, which can take an adjustment period to the new glide, stability, and turning. Sharpening and profiling your new blades to your old ones can minimize the adjustment period.
What is the safest way to remove skate blades?
Use a towel, glove, or even a cut-resistant glove, if possible, and grip the blade from the sides, not by the edges. Take your time and gently pull straight up, making sure to keep your other hand clear of the path. Never yank the blade toward your body.
Can I move my existing steel between two pairs of skates if they use the same holder model and size?
Yes, if the holder model and size are identical, the blades will be able to swap back and forth.